
You've just climbed into a kayak on Lake Bled, pushed off from shore, and within a minute the boat starts to wander. Your arms are already working hard, the paddle feels awkward, and every stroke seems to send you a little farther from where you meant to go. That's the moment most beginners realise that how to paddle a kayak correctly isn't about brute strength, it's about timing, body position, and water conditions.
The good news is that the basics are learnable quickly. Once you understand how to sit, where to place the blade, and how to use your torso instead of your arms, kayaking feels calmer and far more controlled. On Slovenian water, that matters even more, because a quiet morning can turn breezy, a lake crossing can open up, and a narrow river section can ask for sharper adjustments than a flat-water tutorial ever shows.
Table of Contents
- Why Most Beginners Struggle on the Water
- Setting Up Your Body Position in the Kayak
- Mastering the Forward Stroke Technique
- Steering and Turning Your Kayak
- Common Beginner Mistakes and How to Fix Them
- Adapting Your Technique to Slovenian Water Conditions
- Practice Drills to Build Confidence on Your First Trip
Why Most Beginners Struggle on the Water
A first-time paddler on Lake Bled often starts with the same surprise. The lake looks calm from shore, but once the kayak moves out, the boat feels sensitive, every stroke has consequences, and a small mistake can turn into a slow circle. The paddler gets tired, looks down, pulls harder, and somehow ends up moving less efficiently than the people gliding past.
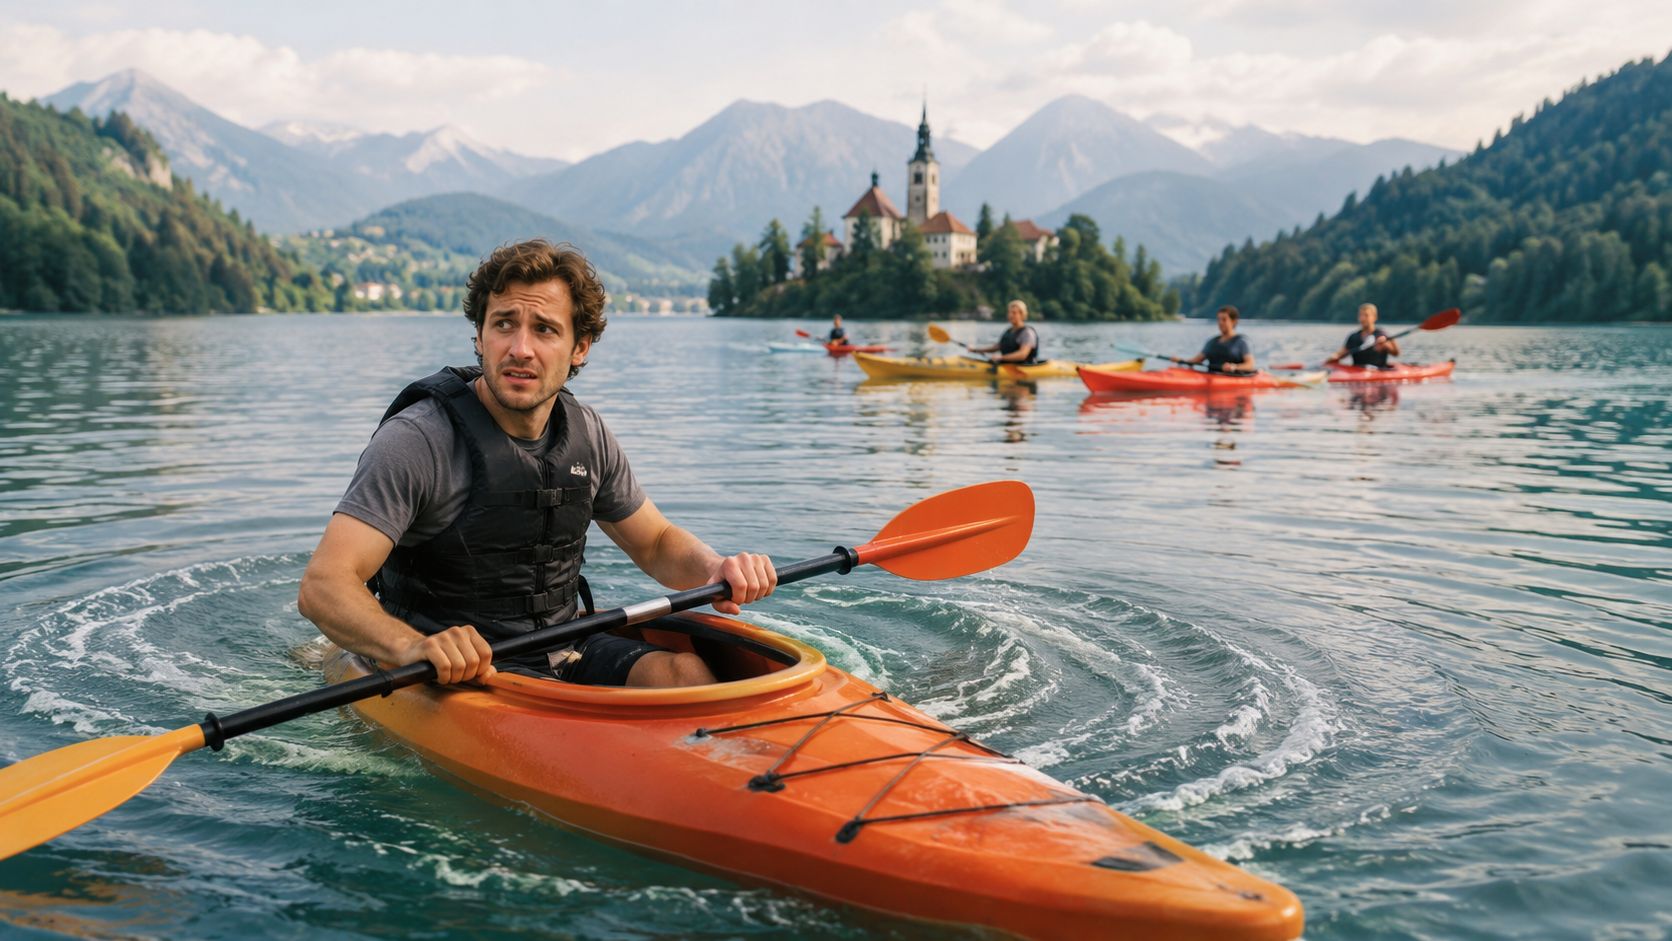
The problem is rarely fitness alone. It's usually a cluster of small issues, a rigid torso, a blade that enters too far from the boat, shoulders that lift, and a grip that gets tighter with every stroke. REI's beginner guidance keeps the foundation simple, calm conditions, a gentle launch spot, and a posture that lets the larger muscles work instead of the arms alone, which is the right starting point for any beginner on Slovenian water. REI's beginner kayaking advice
Practical rule: if your shoulders are burning before your core feels involved, your stroke is doing too much with the arms.
What changes the whole experience
A kayak responds to clean, efficient movement. That means the body has to stay organised, the paddle has to enter close to the kayak, and the stroke has to finish before it drifts too far behind you. That basic pattern is what turns a tiring outing into a controlled one.
Beginners often think the answer is a stronger pull. Usually, the answer is a better setup. Once you stop muscling the paddle and start using the whole body, the boat tracks better, turns less unexpectedly, and feels easier to steer even when the water gets a little busy.
On guided trips around Lake Bled, we see this happen fast. People who arrive convinced they're “not strong enough” usually leave with a very different opinion once they've learned the sequence and felt the kayak respond correctly.
Setting Up Your Body Position in the Kayak
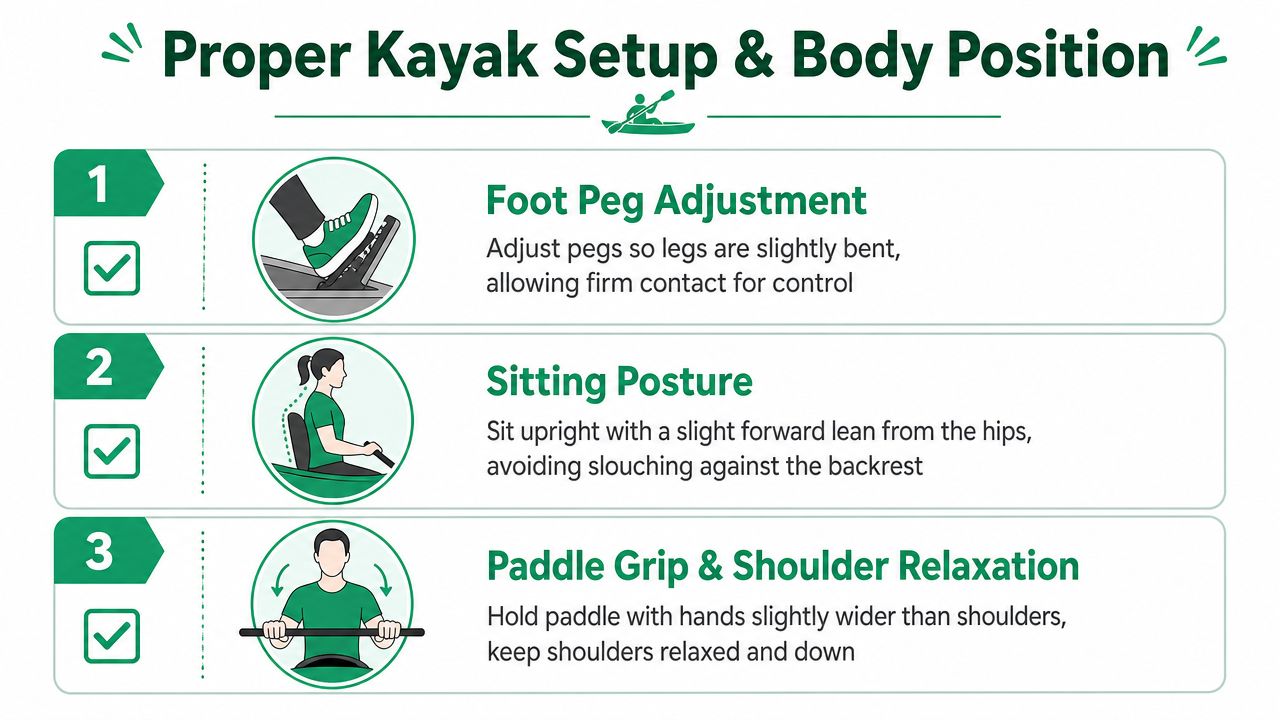
The easiest paddling mistake to fix is the one you make before the boat even moves. Sit upright, keep a small forward lean from the hips, and relax your shoulders so the upper body can rotate freely. If the seat back invites you to slouch, ignore it, because a slumped position makes the stroke shorter and weaker.
The feet matter too. Adjust the foot pegs so your legs feel supported and you can press against them without locking your knees. That contact helps transfer power through the boat, which is why paddlers who ignore the foot braces often feel unstable even when the water is calm.
Find the paddler's box first
Kayak instruction consistently points beginners toward the paddler's box, which means keeping the elbows at roughly 90 degrees, the shoulders relaxed, and the paddle in a position that lets the torso do the work. REI gives a simple fit check, place the paddle shaft centre on your head, then adjust until your elbows sit around that angle. It's a quick way to tell whether the paddle is too wide or too narrow for your body. REI's kayak stroke guide
Keep the power face of the blade toward you, with the shaft perpendicular to the water surface. That orientation matters because it sets the blade up for a clean catch and keeps the stroke from wasting effort sideways. When the shaft and your arms form a neat working rectangle, the paddle feels less awkward and the movement becomes easier to repeat.
Sit tall, keep the shoulders loose, and let the feet brace the boat. If the setup feels balanced on land, it'll feel much easier on the water.
A lot of early fatigue comes from poor alignment, not poor effort. Once the body is arranged correctly, the stroke starts working with the core instead of fighting it.
Mastering the Forward Stroke Technique
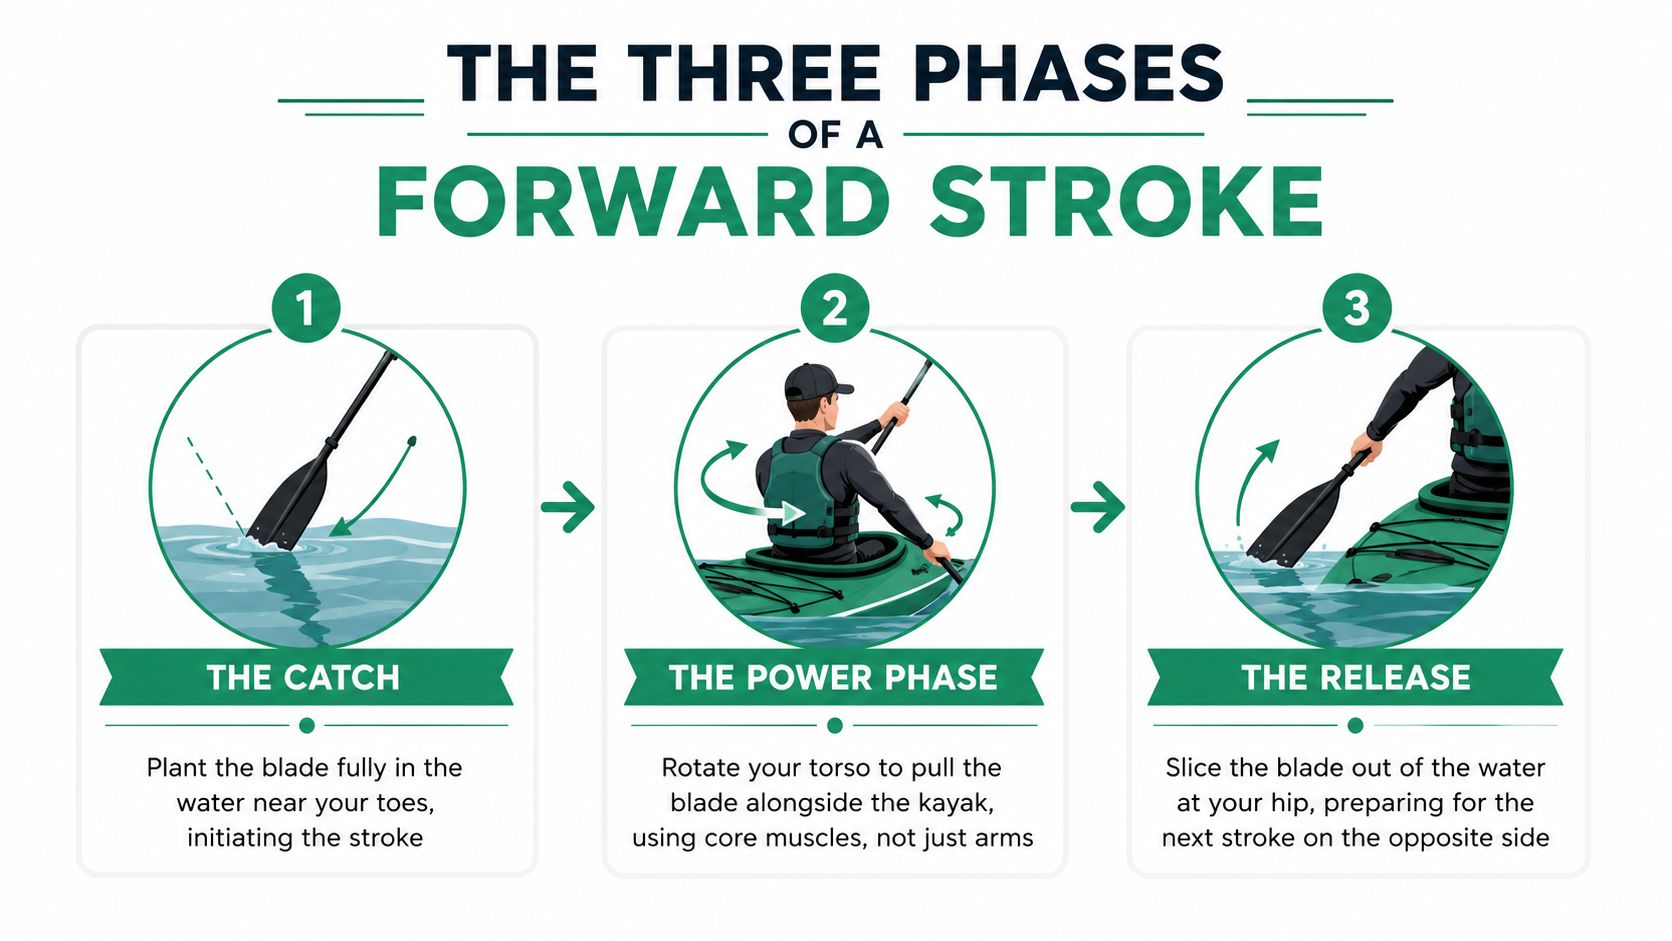
The forward stroke does most of the work on a kayak, so the goal is not to muscle it. Start by planting the blade near your feet, then rotate your torso and let the boat move under a steady, controlled pull. On a windy morning at Lake Bled or in a narrow river bend, that clean setup matters because extra arm effort only makes the kayak wander.
The three phases to feel in your body
The catch begins when the blade enters the water near your feet. That entry point gives the kayak a solid grip on the water, which is why reaching too far forward usually backfires. If the blade starts too far out in front, the stroke tends to turn into a shoulder pull instead of a clean plant.
The power phase is where the torso should do the work. Kayak technique sources describe the same pattern, coil the torso, keep the lower arm nearly straight, hold the upper hand around eye level, and uncoil the core to move the boat forward. Keeping the blade vertical or near-vertical helps reduce wasted sideways force and keeps the kayak tracking straighter, especially when the water gets choppy. Kaku Kayaks technique guide
The release should happen once your hand reaches just behind your hip. If you keep pulling after that point, the blade starts dragging and the kayak loses rhythm. A clean exit lets the next stroke begin on the other side without a pause or a sudden twist in the boat.
For a wider look at paddle craft technique across different styles, Blitz Surf Shop's paddleboard guide is a useful comparison, especially if you want to see how body rotation carries over into other water sports. If you want a Slovenia-specific paddle setup reference, our own kayak paddle guide is a practical companion.
Steering and Turning Your Kayak
Once the forward stroke feels steady, steering becomes much easier to understand. A kayak doesn't need dramatic movements to turn. It responds to small changes in blade path, body position, and where you choose to place your effort on the water.
The sweep stroke is the main tool for wide turns. Instead of pulling straight back beside the boat, arc the blade in a broad semicircle from the bow toward the stern. That outward sweep gives the kayak a clear turning force, which is useful when you need to avoid another paddler on a busy Lake Bled morning or re-centre your line after drifting off course.
Two turns beginners actually need
The draw stroke moves the kayak sideways. It's the move you use when you want to come alongside a dock, another kayak, or a shoreline landing spot without overshooting it. Think of it as a precision adjustment rather than a dramatic manoeuvre.
A slight edge to the kayak can also help the turn happen more cleanly. You don't need to tip the boat aggressively, just enough to help the hull respond. That subtle shift matters on tight sections of the Sava Dolinka, where the shoreline can close in and you need quick corrections without losing control.
Keep turns compact when the water narrows. Big paddle arcs feel powerful, but they can waste space you don't have.
If the kayak feels stubborn, don't fight it with extra arm force. Shorten the stroke, reduce the size of the turn, and let the boat respond to a clearer line rather than a harder pull.
Common Beginner Mistakes and How to Fix Them
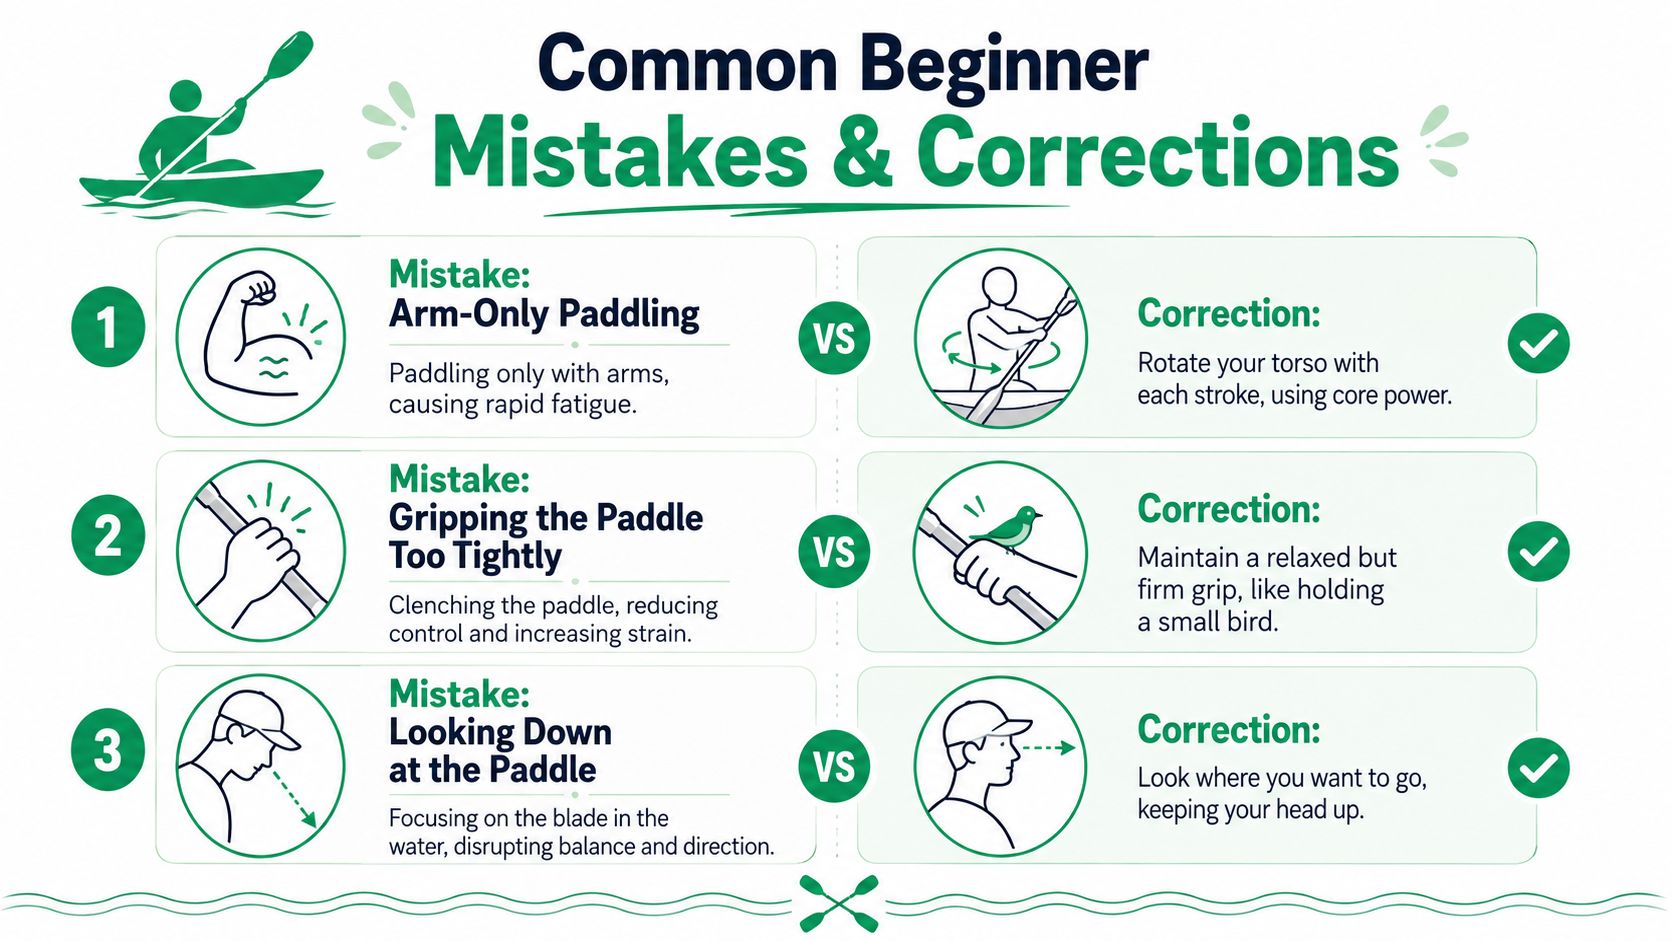
The fastest way to improve is to recognise what the mistake feels like while you're doing it. Arm-only paddling usually shows up as tired shoulders, a sore upper back, and a kayak that still doesn't want to go straight. The fix is simple, rotate the torso and let the blade move with the body rather than against it.
The problems guides see most often
Gripping the paddle too tightly creates a different kind of mess. The hands tense up, the wrists stiffen, and the whole upper body starts to feel locked. A relaxed but firm grip works better, the same kind of controlled hold you'd use when you want precision without squeezing life out of the shaft.
Looking down at the paddle is another common habit. It throws off balance and makes it harder to read where the boat is going. Keep your head up and look where you want to travel, because the kayak tends to follow the direction your attention gives it.
The body position matters here too. Kayak instruction consistently keeps the paddler in a paddler's box, with the elbows at roughly 90 degrees, the shoulders relaxed, and the blade entering near the feet so the torso can drive the stroke instead of the arms alone. Paddler's box technique demo
When beginners fix these three habits together, the change is immediate. The boat feels quieter under them, the stroke feels shorter and cleaner, and the paddler stops fighting the kayak just to stay on line.
For people planning group outings or beginner sessions, the same disciplined preparation helps in other settings too, and event management tips for beginners is a surprisingly relevant analogy for anyone trying to keep moving parts organised without creating stress.
Adapting Your Technique to Slovenian Water Conditions
Most paddling advice assumes still water and perfect weather. That's not how many Slovenian outings feel once you're on the lake or moving through a narrower stretch of river. REI's beginner guidance starts with calm, sunny conditions and even suggests paddling into the wind first if it's breezy, which is sensible, but it doesn't go far enough for exposed lake sections or variable wind on popular day-trip water. REI's getting started kayaking guide
On a windy crossing of Lake Bled, shorter and more frequent strokes usually give you better control than long slow pulls. The boat stays more responsive, the blade is easier to place cleanly, and you spend less time drifting off the line you wanted. That same principle helps when boat traffic starts to create small chops on the surface.
Match the stroke to the water in front of you
If you're heading into the wind, do that part first while your shoulders and concentration are fresh. Then let the return leg benefit from the wind if conditions and route make that possible. It's a simple planning habit that reduces the chance of finishing the trip exhausted or sloppy.
Narrow river sections call for compact steering. On the Sava Dolinka, a wide, lazy sweep can take up more room than you've got, so the turn has to stay tight and deliberate. When the water is choppy from afternoon breezes or passing boats, smooth blade entry and a steady cadence matter more than trying to overpower the surface.
For a more practical feel for local conditions, our Lake Bled water temperature page is useful for planning comfort and timing around the season. If you'd rather practise with the right craft already sorted, rent a kayak and work on your stroke in conditions that suit your confidence level.
The best stroke is the one that matches the water you're actually on, not the water you wished you had.
That's the shift from textbook paddling to Slovenian paddling. You stop chasing a perfect-looking stroke and start choosing the right rhythm for the conditions in front of you.
Practice Drills to Build Confidence on Your First Trip
Start on dry land. Hold the paddle, set your hands into the right position, and rotate your torso side to side while keeping the arms relaxed. That simple rehearsal makes the actual stroke feel less awkward once you're floating.
Move into the water and try a stationary drill. Plant the blade near your feet, rotate through the power phase, and focus on a clean release near the hip without worrying about distance yet. The point is to learn the shape of the stroke before you ask the kayak to cover ground.
Then practise a straight-line drill. Paddle twenty strokes on one side without turning, switch sides, and pay attention to whether the boat tracks cleanly or starts to wander. Finish with a figure-eight pattern that mixes forward strokes and sweep strokes so your hands learn how turning and tracking fit together.
For anyone who wants a faster, calmer learning curve, Outdoor Slovenia Activities offers guided kayaking experiences with professional instructors and all equipment included, which is a useful option when you'd rather have real-time feedback than figure everything out alone. If you're comparing training resources more broadly, TP Training's experience-based course article is another example of how structured instruction can make a difficult skill feel much more manageable.
If you want to learn how to paddle a kayak correctly with a friendly local team, come out with Outdoor Slovenia Activities and let us coach you on the water around Lake Bled. Visit Outdoor Slovenia Activities to choose a guided trip, rent the right kayak, and build confidence with instruction that matches real Slovenian conditions.